Tuesday, August 28, 2012

Pretty Duct Tape Bag

So I have been searching and searching for a duct tape bag that isn't just a cube with handles. After all this I FINALLY found one! Ironically enough it was on ductbrand.com the official Duck Tape website haha :) It just took a little searching through the website to find it! Now unfortunately my camera recently broke....but I made my bag with the same pattens of duct tape that they used on the website, so you'll get the idea.


TA DA! Isn't it lovely?  Anyways...you can find the tutorial here.
 
 
Now a few steps in this tutorial are a little hard to understand, so let me explain.
 
 
Step 3. Your going to make 2 triangles and then tape the bases (widest part) together.
 
Step 6. Now this is where most people become confused, but its really simple so don't worry. All you need to do is take the middle of the top edge of your bag and fold it over.  (fold it so the "flap" of the fold is on the inside of the bag.) then tape it. after folding the middle section keep folding the edges at an angle so that it becomes less and less that your folding.
 
 
Another thing that was rather tricky was finding some metal rings....i ended up using some of those rings you use to keep note cards together.
 
 
And that's pretty much it! Thanks so much! Good luck!


Monday, April 30, 2012

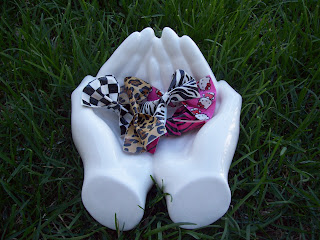
DIY Duct Tape Bows :)


As many of you have already realised, I love making duct tape bows! they are so easy and fun! They take less than 1 min and can be used for so many things! So I thought it was about time I shared with all of you lovely people how to make them! :)


Okay so here's how you make them. :)


  1.  Pick out what color/ pattern of duct tape you would like. Then tear off a strip about 6 inches long, depending on how big you want your bows to be.


2.   Next fold you strip of tape in half. WARNING duct tape is TAPE so it sticks to itself! Make sure you are going to fold it how you want it (so you don't see any of the sticky side ) because once you fold it there's no going back.


3.   Now you're going to take that piece and fold it in half again (hot dog way :] )


4.  Then take the part you just folded and fold over the two flaps back toward the crease of the fold you just made.


5.   Okay that was the hardest part, congrats for making it through it ;) Now cut or tear a small piece of duct tape off the same roll you used for the bow.
(The pens there to help you get an idea of how big it should be.)


6. Then take that small piece and wrap it around where you folded your bow.


AND.........you're done!! Now all you have to do is decided how to use them! Or of course just sit and enjoy them :)


Wednesday, February 29, 2012

RANDOM WENDSDAYS

Hey Y'all so im going to start this thing called random wendsdays...so on some wendsdays from now on ill post something that may com ein handy throughout all your duct taping! :)

okay so today im going to tell you about somthing im not a particular fan of but some of you may find it helpful......
 click here to see, learn more about them

now these sheets come in lots of colors just like normal duck tape....i believe they cost like $3 a sheet but im not totally sure and the price isnt listed on the website.....

ps remeber to follow theblog to be entered into the giveaway! and vote for your favorite necklace!

finding ideas....

hey everybody so a few people have asked me  how i come up with ideas for new duct tape stuff..... so i thought id share with you some of my common inspriations as well as give you a chance to imput what you think i should be making ..... so here we go :)

a BIG inspiration for alot of my jewlery comes from lookinga at all the big necklaces at Forever 21!! ill post a few pick below of necklaces that have totally got me thinking of my next bi g jewlery item.

#1I really like this necklace but im not sure how it would work with duct tape being that the duct tape is so much lighter then chains....
#2this necklace would be super easy to make! If i get around to it ill post a DIY for it.....ill most likley do it in a different color tho.


#3this necklace was part of the inspiration for my silver flower necklace its really fun and im thinking of doing another necklace that looks more similar to this one....

#4okay how cool would this one be in duct tape?! i think i would still want to go with gold on this necklace ...which means a trip to hte store to buy some more duct tape :)

okay so if you look to your right..... you will see a poll to see which necklace you like the best and thing should go duct tape ;) the necklace will chosen will be made, then ill post a DIY for it! yay!! so...vote vote vote!!!


Tuesday, February 28, 2012

DIY Valentine Heart Hair Pin

hhheeeyyy everybody! sorry its been a few weeks but i have been SUPER busy! :) well anywyas I know Valentines day was a week or two ago but i thought id post this anyways.....


so here is my lovely hair pin in the shape of a heart! I made one for myself and one for the girl i teach sunday school with at my church and i just think they are so cute!

Now these were really easy to make. you will just need a few things...

1.) duct tape in the color of your choice :)
2.) an index card
3.) tissue paper (only a little bit)
4.) bobby pin.

okay now how to make them....I'm going to have little drawing to show step by step because it was a little hard to tell in the pics i took.

alrighty step 1. Take your index card and draw out a heart (or whatever other shape you want to make this into) make sure you only draw your shape on half of the note card.


step 2. now fold your index card in half with the side you shape is facing up.


step 3. cut out your shape.


step 4. cover the front and back if you want with the duct tape of you choice. :)


step 5. with the two duct tape shapes on top of each other tape all the edges together except the top of your shape. if needed you can trim the edges after taping to make it look neater


( the darker pink is the part you should tape)

step 6. fill the inside of the shape with tissue paper until its as puffed up as you want it.

uummm im not going to have a picture for this one.....im thinkin you can figure it out ;) haha :)


step 7. tape the top closed just like you  did for the edges.


so all your edges should be taped now :)

step 8. okay now flip over your shape so that the back is facing up.

step 9. grab your bobby pin and hold it open. then while holding it open take a small peice of duct tape and stick it to the inside of the top of the bobby pin so the stivky side is up.


step 9. tape the bobby pin onto the back of your shape so that the top of your bobby pin in against the the back of your shape...(so pretty much just stick it on the back with how the tape is already on your bobby pin.)


Sunday, February 5, 2012

duct tape belt DIY :)

hey guys! sorry i know it's been awhile since me last post....okay bbuuutttt so today im gonna post a vedio via Youtube from the Duck Tape  company.....now i made this belt in silver (go figure right??) and i really like mine :) ill have to post some pics of it later :)      DIY for the Duct Tape belt click here :)

okay well on another note yesterday i had my first sale!!!! AAHH im sso excited :) haha okay so i sold a silver necklace with the rose just like the one in my post This is so Duct Tape Chic :) click here to see the post :) so if you want somthing that you see on Duct Tape Chic please email me and ill tell you the price and will make you one and ship it to you! :)

Sunday, January 22, 2012

Bow Hairclip

hahah well im sure you are all getting sick of my duct tape bows but they are just so fun to make! hhmm perhaps there will be a DIY on them later.....anyways well i thought id post a pic of a duct tape hairclip i made in literally 2 min :) how fantastic is that!

sorry my hairs a little messy :) haha